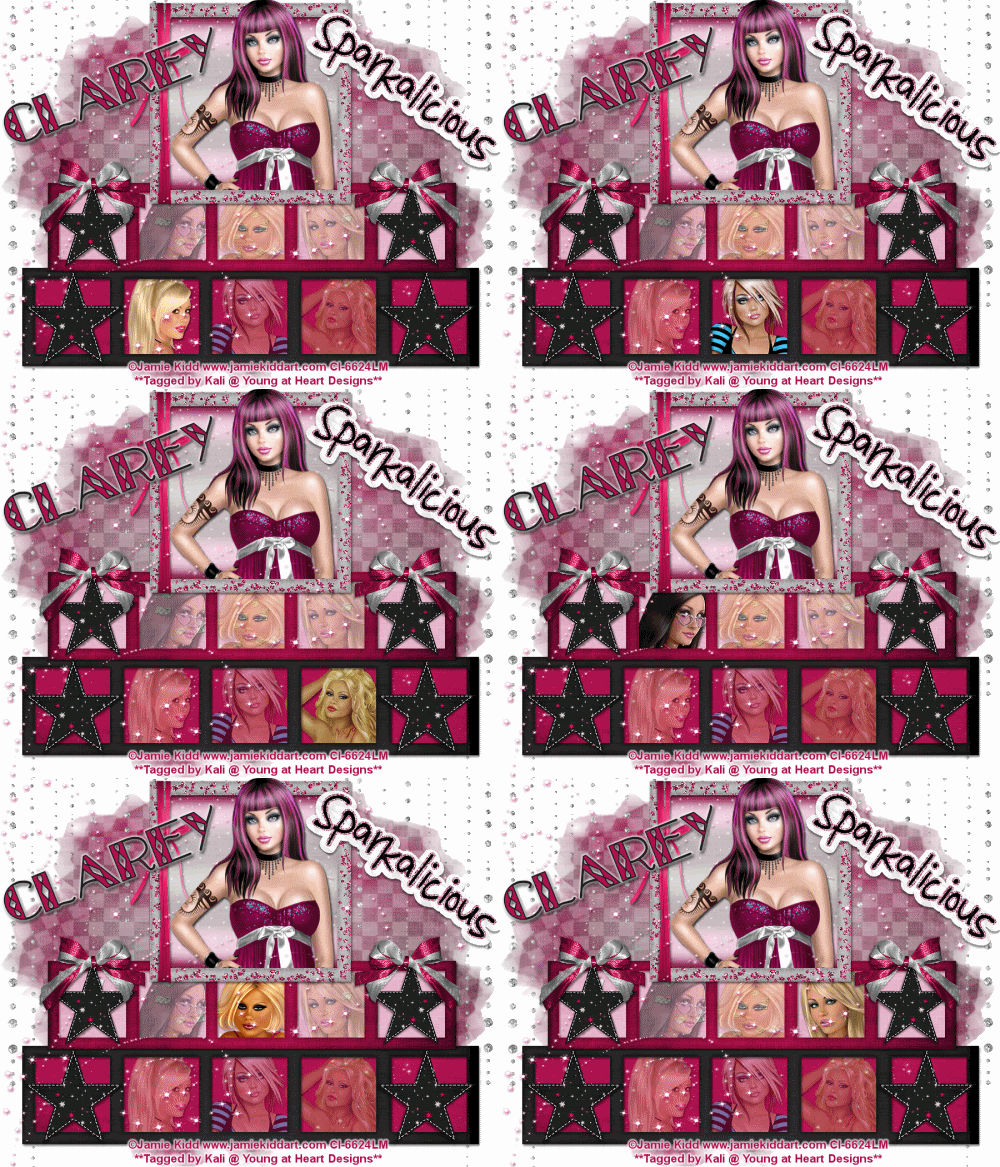
To do this tutorial you must have some knowledge of PSP and Animation Shop.
This Tag was made using PSPX2 and Animation Shop. This tutorial is also copyrighted by Young at Heart Designs.
Im using the Beautiful work of Jamie Kidd. If you wish to use hers work you must have a license to use her work before using her tubes.
To purchase her tubes and receive a license go to HERE.
The adorbale kit I used is called "Sparkalicious" by Clarey Designz and it can be found HERE.
Supplies:
WSL_Mask218 by Chelle: HERE
Font: GlitzyJewel
I used shadow settings V3,H2, O50, B5, Color Black on ALL elements, layers, text and the tube except for the mask layer.
I also sharpened every element and tube I had to resize to get the quality like the original size. To learn how to sharpen please refer to the end of this tutorial.
1 open new canvas 900x700 (we will resize later)
2 Open, copy and paste a new layers clarey_sparkalicious_wrappedframe1, clarey_sparkalicious_sticker, clarey_sparkalicious_longframe1, and clarey_sparkalicious_longframe2.
3 Resize and place where desired.
Use my example for reference.
4 Now click on the black frame and paste a paper of choice. Resize to the canvas size.
5 Select the inside of each Frame with your Magic Wand
6 Selections > Modify > Expand by 5 and click on your paper.
7 Selections > Invert
8 Delete
9 KEEP SELECTED!!
10 Now paste three tubes of your choice each as a new layer in the 3 middle openings.
11 Resize as necessary
12 Position within Frames to your liking.
13 Then press delete, and deselect.
14 Repeat Steps: 4-13 for the pinkish frame.
15 Repeat Steps: 4-8 for the big, top frame.
16 Paste your main tube as new layer and resize as necessary.
17 Position in the top Frame.
18 Paste a paper of choice as new layer. Resize to the canvas size.
19 Layers > Arrange > Send to Bottom.
20 Layers > New Mask Layer > From Image.
21 Locate WSL_Mask218 and click okay.
22 Then go to Layers > Merge > Merge Group. Resize the mask layer to be a little bigger.
23 Open, copy and paste as new layers any elements you desire.
I used a lot of elements so use my example as a reference.
24 Select your Text Tool again and another font of choice.
25 Type out your name.
26 Finally, add your © copyright, licence and watermark, resize, then save as a png and you're done!
If you are going to do the animation, follow these steps:
27 Go to your first layer and get your paint bucket tool.
28 Flood fill white.
29 Activate the in the Frame. This is where it is going to get confusing.
30 Rename to Tube1, Tube2, Tube3 and so on for each original tube.
You should end up with a total of 6. (Tube1-Tube6)
31 Now duplicate each tube once giving you 2 of each tube.
32 Rename the duplicates Copy Tube1, Copy Tube2 and so on til they are all renamed.
33 Reduce the opacity of each Copy to 50.
34 Hide all layers but for Tube1, Copy Tube2, Copy Tube3, Copy Tube4, Copy Tube5 and Copy Tube6.
35 Edit > Copy Merged
36 Open Animation Shop
37 Edit > Paste as New Animation
38 Back to PSP Hide last layers and unhide Tube2, Copy Tube1, Copy Tube3, Copy Tube4, Copy Tube5 and Copy Tube6.
39 Edit > Copy Merged
40 In Animation Shop Edit > Paste after Current Frame
41 Back to PSP Hide last layers again and unhide Tube3, Copy Tube1, Copy Tube2, Copy Tube4, Copy Tube5 and Copy Tube6.
42 Edit > Copy Merged
43 In Animation Shop Edit > Paste after Current Frame.
44 Back to PSP Hide last layers again and unhide Tube4, Copy Tube1, Copy Tube2, Copy Tube3, Copy Tube5 and Copy Tube6.
45 Edit > Copy Merged
46 In Animation Shop Edit > Paste after Current Frame.
47 Back to PSP Hide last layers again and unhide Tube5, Copy Tube1, Copy Tube2, Copy Tube3, Copy Tube4 and Copy Tube6.
48 Edit > Copy Merged
49 In Animation Shop Edit > Paste after Current Frame.
50 Back to PSP Hide last layers again and unhide Tube6, Copy Tube1, Copy Tube2, Copy Tube3, Copy Tube4 and Copy Tube5.
51 Edit > Copy Merged
52 In Animation Shop Edit > Paste after Current Frame.
You should end up with a total of 6 frames.
53 Now you can edit your Frame Properties to 75, then save as a GIF and you're done!
Thanks for doing my tut. Send me the results!!
Thanks,
Kali


No comments:
Post a Comment