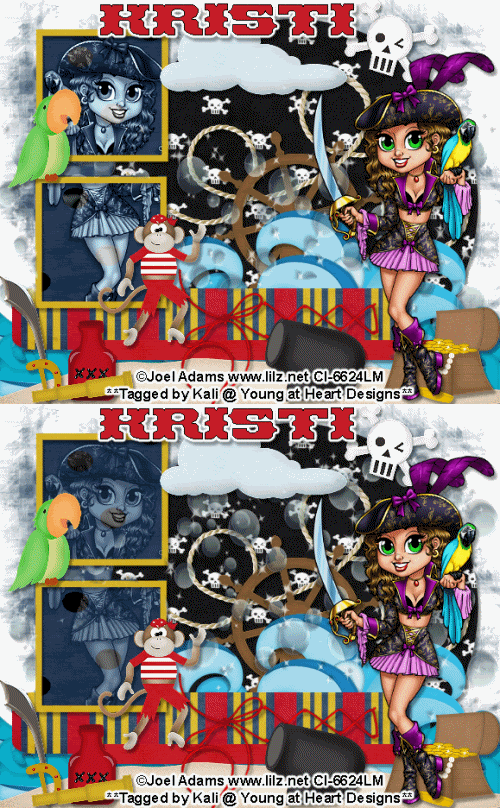
Boy Version

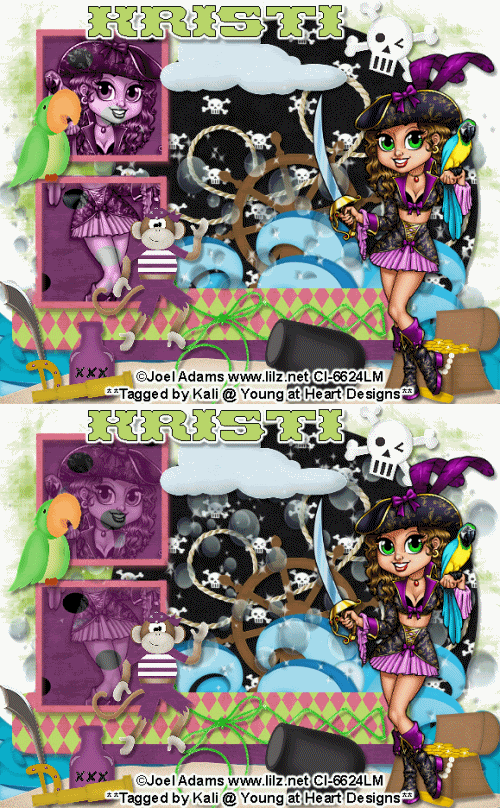
Girl Version

To do this tutorial you must have some knowledge of PSP and Animation Shop.
This tut was written and copyright by Kali at Young at Heart Designs.
I used PSPX2 and Animation Shop to create this tut.
Supplies:
-IAdorable Kit by Kristi W. at Scrappin Divaz Designz called "Walk the Plank" and can be found HERE.
-Awesome artwork by Joel Adams and her artwork can be found HERE. You must have permission to use her artwork and hold a license. Please do not use without purchasing the artwork.
-Font: Pirates Gold
-Plug-in>Eye Candy 4000>Gradient Glow
-Mask #297 by WSL: HERE
-Templated #1 by Sara's Sinful Creations: HERE
I have added a drop shadow to pretty much every layer and I also sharpened all elements if I resized them so they maintained the same
quality as the original one.
1 Open new template.
2 Delete the copyright layer.
3 Click on the Circle layer.
4 Open your choice of paper and resize to canvas size.
5 Click back on the Circle Layer and go to Selections>Select All>Float>Defloat.
6 Click on the newly added paper layer and go to Selections>Invert and hit delete on your keyboard.
7 Delete the original Circle layer.
8 Repeat Steps #: 3-7 for all included layers in the template.
9 Open the water element from the kit.
10 Resize to the width of the canvas.
11 Mirror it so you can see the waves good.
12 Now duplicate it and then mirror again.
13 Move the duplicated layer down a bit.
14 Duplicate it one more time and mirror it.
15 Move this duplicated layer down a little bit that way the bottom of the canvas is waves.
16 Merge all the water layers together and move this layer under the Rectangle 1 layer.
17 Add the sand element at the bottom of the canvas.
18 Open your choice of tube.
19 Resize and position where desired.
20 Duplicate the tube and move the duplicated tube under the frame layer and just above the squares.
21 Get your eraser tool and erase any of the tube that is sticking out past the frames.
22 For both the duplicated tube change the layer properties to Luminance Legecy.
23 Open desired elements from the kit.
24 Resize and position where desired.
Use my example for reference.
25 Click on your water layer and open the bubbles element from the kit.
26 Resize and position where desired.
27 Duplicate the bubbles how many times you want. What I did was duplicated it 10 times and some I resized to be smaller and some I mirrored.
This way it looks like a bunch of bubbles.
28 Get your eraser tool and erase any bubbles that you don't want showing in certain places.
29 Get your text tool and font of choice.
30 Type out any desired wording. Add gradient glow to the wording too.
31 Add copyrights.
32 If you are not doing the animation resize and save as a png.
If you are doing the animation, follow these steps:
33 Unhide the background layer.
34 Duplicate the tube again.
35 On the newly duplicated tube change the opacity to 50%.
36 Click on the bubbles layer.
37 Duplicate it and then flip the image.
38 Position to look a little higher than the first set of bubbles.
39 Again, get your eraser tool and erase any bubbles you do not want.
40 Copy merge and go to Animation Shop.
41 Paste as a new animation.
42 Back in PSP, hide the 1st ones and unhide the 2nd ones.
43 Copy merge and go to AS.
44 Right-click your frame and Select Paste After Current Frame.
45 In AS, select all frames and change the frame properties to 75.
46 Resize and save as gif.
You are all done!!!
Thanks for doing my tut,
Kali

Girl Version

To do this tutorial you must have some knowledge of PSP and Animation Shop.
This tut was written and copyright by Kali at Young at Heart Designs.
I used PSPX2 and Animation Shop to create this tut.
Supplies:
-IAdorable Kit by Kristi W. at Scrappin Divaz Designz called "Walk the Plank" and can be found HERE.
-Awesome artwork by Joel Adams and her artwork can be found HERE. You must have permission to use her artwork and hold a license. Please do not use without purchasing the artwork.
-Font: Pirates Gold
-Plug-in>Eye Candy 4000>Gradient Glow
-Mask #297 by WSL: HERE
-Templated #1 by Sara's Sinful Creations: HERE
I have added a drop shadow to pretty much every layer and I also sharpened all elements if I resized them so they maintained the same
quality as the original one.
1 Open new template.
2 Delete the copyright layer.
3 Click on the Circle layer.
4 Open your choice of paper and resize to canvas size.
5 Click back on the Circle Layer and go to Selections>Select All>Float>Defloat.
6 Click on the newly added paper layer and go to Selections>Invert and hit delete on your keyboard.
7 Delete the original Circle layer.
8 Repeat Steps #: 3-7 for all included layers in the template.
9 Open the water element from the kit.
10 Resize to the width of the canvas.
11 Mirror it so you can see the waves good.
12 Now duplicate it and then mirror again.
13 Move the duplicated layer down a bit.
14 Duplicate it one more time and mirror it.
15 Move this duplicated layer down a little bit that way the bottom of the canvas is waves.
16 Merge all the water layers together and move this layer under the Rectangle 1 layer.
17 Add the sand element at the bottom of the canvas.
18 Open your choice of tube.
19 Resize and position where desired.
20 Duplicate the tube and move the duplicated tube under the frame layer and just above the squares.
21 Get your eraser tool and erase any of the tube that is sticking out past the frames.
22 For both the duplicated tube change the layer properties to Luminance Legecy.
23 Open desired elements from the kit.
24 Resize and position where desired.
Use my example for reference.
25 Click on your water layer and open the bubbles element from the kit.
26 Resize and position where desired.
27 Duplicate the bubbles how many times you want. What I did was duplicated it 10 times and some I resized to be smaller and some I mirrored.
This way it looks like a bunch of bubbles.
28 Get your eraser tool and erase any bubbles that you don't want showing in certain places.
29 Get your text tool and font of choice.
30 Type out any desired wording. Add gradient glow to the wording too.
31 Add copyrights.
32 If you are not doing the animation resize and save as a png.
If you are doing the animation, follow these steps:
33 Unhide the background layer.
34 Duplicate the tube again.
35 On the newly duplicated tube change the opacity to 50%.
36 Click on the bubbles layer.
37 Duplicate it and then flip the image.
38 Position to look a little higher than the first set of bubbles.
39 Again, get your eraser tool and erase any bubbles you do not want.
40 Copy merge and go to Animation Shop.
41 Paste as a new animation.
42 Back in PSP, hide the 1st ones and unhide the 2nd ones.
43 Copy merge and go to AS.
44 Right-click your frame and Select Paste After Current Frame.
45 In AS, select all frames and change the frame properties to 75.
46 Resize and save as gif.
You are all done!!!
Thanks for doing my tut,
Kali


No comments:
Post a Comment