
 This Tutorial was written by me on July 1, 2009 . Any similarities is purely coincidental. You must have a working Knowledge of psp and animation shop t0 do this tutorial.
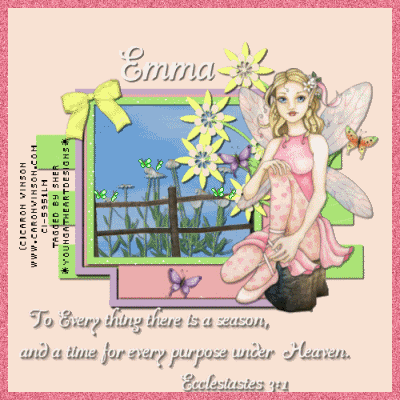
Today I'm using the beautiful work of Caron Vinson. You must have a license to use her tubes. You can get her beautiful tubes and the license Here
The scrap kit was designed by Sensual Posers , Thanks Emma for the Beautiful Kit!You can get this Beautiful kit from her store Here
The template I'm using was made by Lorna you can get it Here
The font I'm using is al heavenly you can get it Here
The animations are in my supplies Here
Filter I used is Alien skin xenofex 2 (Little Puffy Clouds)
You can get Here
dsb flux Here
Ok lets get going! :)
Open the template in psp , copy and close original.
Delete the copyright layer, and the dotted line layers.
Go to Image and resize the canvas to 600x600 and flood fill this layer with color of choice
or use the one I chose #fbe2d4
Select the Grey line layer in you pallet and go to selections, select all,
float, defloat, Open a paper of choice and copy and paste it as a new layer,
go to selections, invert, hit delete on your keyboard and select none.
Select the black rectangle layer in your pallet, go to selections, select all, float , defloat, open a paper of choice , copy and paste as a new layer, invert, hit delete on your keyboard, select none.
Go to effects , plug ins alien skin xenofex 2 and select little puffy clouds and apply to this layer.
Click on the frame layer and using your magic wand click inside the dark Grey part, and copy and paste a paper of choice , selections, invert, hit delete on your keyboard, select none.
Click on this frame Layer again, using the magic wand click on the inside frame part, open a paper of choice and copy and paste it as a new layer, selections, invert, hit delete on your keyboard, select none.
Click back on this frame layer again and using magic wand click on the outside
frame , choose a color from your tube, I used #c6a8cg and flood fill with this color, select none.
Open Your tube up in psp and select the layer with the two butterflies, copy and paste as a new layer, resizing to 80% and placing where desires or see my tag for placement.
Copy and paste the butterfly layer from your tube and place it where desired.
Add any other elements you want from the kit and resize and place where desired.
I used bow 5, flower 25, the fence , the stump, and the daisys.
I placed them all on a seperate layer an d gave them a drop shadow
Add text and place where desired.
I chose to use the text from scripture.
For everything there is a season
And a time for every purpose under Heaven
Ecclesiastes 3:11
Re size all layers to 500x500
click on Top layer, select all, modify, contract by 15, invert, add a new raster layer and flood fill this with a color from tube, selections, select none.
click on this new layer and go to effects, plugins, deflux, bright noise, using intensity 28 mix ok
Repeat it once more.
Add copyrights
If you don't plan on animating this tag , merge all layers and your done.
If you plan on animating lets go!
In animation shop open the animations and minimize for now
In psp close off the girl tube, the bow, the stump,and the flower, go to edit, copy special copy merge , take to animation shop and paste as a new animation, copy this layer 7 times.
Back to psp close off the layers you have opened, and open the ones you have closed. This time only the girl tube layer , the stump layer, the flower layer and the bow layer should be open. Go to edit, copy special , copy merge and take to animation shop , paste this as a new animation and
copy it 6 times so you have 7 layers, go to edit , select all, copy , and paste this into your original animation and postioning it where it needs to go.
Maximize the star 1 animation and select all , copy,
Click on your tag animation and select all and paste the star 1 which is vertical, around the vertical side of inside frame. repeat this 3 more times on the vertical sides. Open the star 2 and repeat this on the horizontal sides of the inside frame.
On the tag animation go to edit, select all , copy and click on the last frame and select it , copy after selected frames. You should have 14 frames now. Click on last frame of this animation and copy and paste after current frame so you have 15.
Maximize the butterflies animation and edit, select all, copy into selected frames. Repeat this step to the numbers of butterflies you want. I did this 3 times total.
Once you have done all this Run your animation and if you like what
you have created, save as a gif and your done.
Thanks for trying my Tutorial!
Huggies
Sher


No comments:
Post a Comment